PREP TIME: 10 minutes COOK TIME :1 hour 30 minutes PRESSURE RELEASE: 30 minutes TOTAL TIME: 2 hours 10 minutes.
Ingredients
4 lb pork butt (pork shoulder)
2 1/2 tsp sea salt
1 tsp black pepper
1/2 cup chicken bone broth
1/4 cup fresh lime juice (about 2 limes)
1/2 cup chopped onion
3 garlic cloves, minced
1 jalapeño, seeded and chopped (optional)
Pork Rub
1 tbsp dried oregano
2 tsp cumin
2 tsp dried cilantro (Unless you’re like me and Cilantro tastes like soap)
1 tbsp avocado or olive oil
Instructions
Rinse and dry the pork butt/shoulder, and cut it into quarters.
Rub it all over with salt and pepper.
Combine the rub ingredients then rub all over the pork.
After seasoning, brown the meat on all sides in the instant pot using the sautè function
Cancel sautè, remove meat and deglaze with the lime juice.
Place the pork back in the Instant Pot, and pour over it the bone broth. Top with the onion, jalapeño, and minced garlic.
Pressure cook on high for 1 hour and 30 minutes. Let pressure release naturally, this takes about half an hour.
Remove the pork pieces to a large plate or dish. Let it cool slightly and use two forks to shred the meat.
Skim the fat off the remaining juices in the Instant Pot. Use the sauté function on high for 10 to 15 minutes to reduce the liquid to a sauce for the meat. Pour the sauce into a dish.
Heat 1 tbsp of avocado or olive oil in the Instant Pot on sauté or a cast-iron skillet over high heat. Spread the pork (in batches) in the pot/pan and spoon over about 1/4 cup of juices. Wait until the juices evaporate and the bottom side is golden brown and crusty. Turn the meat over and barely sear the other side. It’s best when some meat is seared and some still juicy.
Repeat step 8 in batches until complete.
Serve hot with extra juices, chopped fresh cilantro, sour cream, avocado, or other toppings. Add a salad or cauliflower rice on the side.
2 Tbsp gluten-free seasoning (like Tony Chachere’s Original Creole Seasoning, divided)
Sea salt and freshly ground pepper
1 lb boneless, skinless chicken thighs, cut into 3/4-inch pieces
3 stalks celery, sliced about 1/2-inch thick, with leaves
1 red & 1 green bell pepper, cut into large dice (3 cups total)
12 oz Savoie’s andouille sausage, sliced into 3/4-inch disks
1 Tbsp tomato paste
2 Tbsp butter
1 lb medium peeled, deveined shrimp
Instructions
Preheat the oven to 400°F (205°C). Line a rimmed baking sheet with aluminum foil or parchment paper.
In a bowl, combine the cauliflower rice, 1 tablespoon of the olive oil, 1½ teaspoons of the Creole seasoning, 1/2 teaspoon salt, and 1/4 teaspoon black pepper. Toss to evenly distribute, spread on the prepared baking sheet and roast, tossing occasionally, until the cauliflower rice is dry and a bit crispy-edged, about 12 minutes.
Meanwhile, season the chicken pieces evenly with 1-1/2 teaspoons of the creole seasoning, 1/2 teaspoon salt, and 1/4 teaspoon pepper.
In a 4 to 6-quart pot oven over medium-high heat, heat 1 tablespoon of the olive oil. When hot, add the chicken and cook, turning frequently, until browned on all sides, 5 to 6 minutes total. Remove the chicken to a plate. Reduce the heat to medium and add the celery, peppers, and sausage. Cook, stirring occasionally, until the vegetables are softened and the sausage is seared in places, 4 to 5 minutes.
Add the tomato paste and the remaining 1 tablespoon Creole seasoning, and toss to combine. Add 1/2 cup of water and scrape up any bits from the bottom of the pan. Let the mixture come to a simmer and thicken up a little, 2 to 3 minutes.
Reduce the heat to low and stir in the butter. When incorporated, gently stir in the shrimp and chicken and cook until shrimp is slightly opaque and a little “white” in color, 3 to 4 minutes.
Stir in the cauliflower rice, season to taste with salt and pepper, and serve.
This Indian dish tastes far more complicated than it is. Served with low-carb riced cauliflower for an easy and delicious weeknight meal. It can also be made in advance and put into the freezer. It freezes and reheats beautifully, which is why I doubled the original recipe. If you want to make a small batch to try, just half everything.
INGREDIENTS:
3 pounds boneless skinless chicken thighs 1/2 cup coconut oil or ghee 2 small diced onions, about 5 ounces 4 cloves minced garlic 2 Tablespoons fresh grated ginger 4 Teaspoons each Curry and Masala 1 Teaspoon each Turmeric and chili powder 16 ounce can of unsweetened diced tomatoes 1/2 cup heavy whipping cream or creamed coconut milk 4 Teaspoons coconut flour or 4 Tablespoons almond flour (optional, but recommended)
DIRECTIONS:
Measure out spices, dice onions, mince garlic.
Dice chicken thighs into 1 1/2 inch chunks
Heat a large saucepan over medium-high heat, add coconut oil or ghee, onions, ginger, and garlic and cook until fragrant, 3 to 5 minutes, stirring constantly.
Add all spices and cook for another minute or so.
Pour in the tomatoes, including the juice, and stir well.
Add diced chicken and stir to coat; season with salt and bring to a boil.
reduce heat to medium-low, cover, and cook for 30 minutes, stirring occasionally.
Remove cover, add the heavy whipping cream or creamed coconut milk.
Add the almond or coconut flour, if using.
Stir and cook for another five minutes. Remove from heat.
Prep Time: 10 minutes (Season the brisket the day before, refrigerate overnight) Cook Time: 8 to 11 hours Smoker Temp: 225℉ Smoker Time: 4 to 5 hours Oven Temp: 250℉ Oven Time: 4 to 6 hours
INGREDIENTS:
1 (12 lb) whole packer beef brisket
1/3 Cup Himalayan sea salt
2 Tablespoons garlic powder
2 Tablespoon dried onion
2 Tablespoons dried rosemary, finely chopped
3 Tablespoons black pepper
DIRECTIONS:
Season the brisket the day prior to cooking: Mix salt, garlic powder, dried onion, rosemary and pepper in a small bowl. Season the meat liberally. Place in refrigerator overnight.
Remove from refrigerator about an hour prior to cooking and allow meat to come to room temp.
Set smoker temp to 225℉ and preheat, lid closed, for 15 minutes.
Place brisket fat side up on grill grate. Smoke brisket for approximately 4 to 5 hours, or until the brisket reaches an internal temperature of 160℉ to 165℉.
Preheat oven to 250℉
Line roasting pan with foil, or use foil pan.
Remove brisket from grill, place fat side up in lined roasting pan or foil pan. Cover tightly with foil.
Place in preheated 250℉ oven* until the brisket reaches an internal temperature of 205℉, approximately another 4 to 6 hours, for a total of 8 to 11 hours smoke and cook time.
Remove from oven, allow to rest loosely covered for about an hour
After resting, slick the brisket against the grain, about 1/4 inch thick and serve.
Notes:
*The entire process can be done on the smoker, just wrap it in the foil and skip the part where it is removed from the smoker and put into the oven. Up the temp on the grill from 225℉ to 250℉.
Pork belly is one of our favorite dishes, so I purchase a big one, cook it up, portion it out, vacuum seal it and put it in the freezer; I’m all about easy meal prep. As far as the cooking, I use one of two methods. We have a Traeger smoker, and I like to use that to give the pork belly a nice smokey flavor, then finish it up in the oven; other times I don’t want to go to the extra trouble and just do the whole process in the oven.
Prep time: 30 minutes, overnight in refrigerator.
Cook time 6 hours
Smoker temp: 225°F
Oven temp: 250°F
THE INGREDIENTS ARE SIMPLE:
12 pound pork belly 1/3 cup salt 2 tablespoons black pepper 2 tablespoons smoked paprika
Mix seasonings together, I keep an empty shaker bottle on the spice rack for just this purpose.
With the pork belly laying flat, fat side up, use a very sharp knife to make cross cuts about 1/4 inch deep, but not into the meat, and about 1 inch apart. Season pork belly, let the seasoning get down into the cuts as much as possible; flip and season the meaty side. Wrap tightly with plastic wrap, then aluminum foil; refrigerate overnight.
COOKING DIRECTIONS:
First, the Traeger method:
Preheat Traeger to 225°F
Place pork belly on grill, fat side up. Close lid and smoke for four hours until it’s somewhere in the neighborhood of 160°F.
The next step can be done in the smoker, but I prefer to do it in the oven.
Line a roasting pan with foil, or use a foil pan.
Place pork belly into pan, fat side up, and cover tightly with foil.
Put in preheated 250°F oven for 1.5 to 2 hours, until temp reaches 195°F to 200°F
Remove foil, raise oven temp to 500°F and continue cooking until the skin is golden brown, bubbling and crispy, about 8 to 10 minutes.
Remove from oven and let rest for 10 minutes.
Slice and serve; cover and refrigerate remaining belly. Once it’s thoroughly chilled slice it into portions and vacuum seal for freezer.
The Oven Method:
Preheat oven to 275°F
Line a roasting pan with foil, or use a foil pan. Place pork belly into pan, fat side up, and cover pan tightly with foil. Put in preheated 275°F oven for 6 hours, until temp reaches 195°F to 200°F
Remove foil, raise oven temp to 500°F and continue cooking until the skin is golden brown, bubbling and crispy, 8 to 10 minutes.
Remove from oven and let rest for 10 minutes.
Slice and serve; cover and refrigerate remaining belly. Once it’s thoroughly chilled slice it into portions and vacuum seal for freezer.
1/2 pound chicken livers, soaked for 24 hours in full cream milk then drained 1/2 cup water 5 tablespoons of avocado oil 1/2 small onion diced 2 small garlic cloves crushed 1/2 teaspoon of fresh thyme leaves Salt ½ cup water 8- 12 tablespoons unsalted butter, room temperature Freshly ground black pepper
INSTRUCTIONS:
Trim the white connective tissue from the chicken livers, then place in a bowl, cover with whole milk, and soak for 24 hours. drain.
Warm the avocado oil in a medium sized frypan, add the livers, onion, garlic, and thyme, and 1/2 teaspoon of salt, stir to combine. cook until onions are soft and translucent and livers are slightly browned.
Add the water, cover the pan and cook over a low heat until the liver is barely pink in the center when tested, about 10 minutes.
Remove the pan from heat and allow to stand for 5 minutes.
Drain the fluid from the pan and transfer the livers, onion, garlic, and thyme to a food processor, process until the mixture resembles crumbs.
Add 8 tablespoons of butter with the motor on – two tablespoons at a time – until it is incorporated, season with salt and pepper check for desired creamy-ness, if you want it more creamy, add more butter.
Scrape the mixture into a suitably sized container (or several smaller containers), and cover with a small amount of melted butter to protect the surface from browning. Keeps for about a week in the refrigerator, or for a month in the freezer.
The day before: Before you even think of taking the ribs out of the fridge, make the dry rub. (thank me later) After making the rub, remove the ribs from their packaging and pat dry with paper towels. Trim ribs of excess flap meat and pull off the silver skin membrane on the bone side. Brush both sides of ribs with mustard – Most Dijon’s have sugar added, make sure to choose one that does not, or use yellow mustard. Apply dry rub liberally on both sides, cover in plastic wrap, then foil. Chill in fridge overnight. This is an important step, don’t skip it. If you have time, go ahead and make the BBQ sauce the day before as well.
A big thank you to Mary Cressler at Vindulge.com, from whom I got this recipe, making my own little tweaks of course. If you want to see the original, I totally understand. I am still very much a novice blogger, and never think to take pictures of the process until it is too late. I do take pictures of the final product, but that really isn’t very helpful to some. Mary did take pictures, so if you need that, click the link, it will open in a new tab.
After doing a bunch of reading, I was confused as to which method was better, meat side up, or meat side down; there was compelling reasons for both, so I experimented and did one of each. Other than the ‘meat side down’ rack having grill marks, I couldn’t tell a difference. So, the decision is yours.
Cook Time, about 6 hours Servings 4 -6 servings
Ingredients summary:
This is everything you will need for this recipe, some will be divided
2 racks spare ribs, St. Louis cut 4 tablespoons dijon mustard (Make sure to choose a sugar free one, or use yellow mustard) 5 tablespoons butter (divided, or 4 TBSP butter, and 1 TBSP avocado oil) 3 cups + 6-8 tablespoons apple cider vinegar (divided) 2 tablespoons + 1/2 teaspoon kosher salt (divided) 2 tablespoons coarse ground pepper 2 tablespoons fresh rosemary, finely diced 2 1/2 tablespoons paprika (divided) 1 tablespoon garlic powder 1 tablespoon oregano 3/4 teaspoon cayenne pepper (divided) 1 small onion, chopped (about 1 cup) 1 can (15 oz) tomato sauce (no sugar added) 2 cloves garlic, diced 3 tablespoons tomato paste 1/2 tablespoon dry mustard 1/4 teaspoon fresh ground black pepper 1 tablespoon Worcestershire sauce ((GASP, it has sugar and molasses in it, use it anyway)) Optional, but recommended: 2 TBSP brown sugar Swerve
Ingredients:
the Ribs
2 racks spare ribs, St. Louis cut
4 tablespoons dijon mustard (Make sure to choose a sugar free one, or use yellow mustard)
2/3 cup sugar free dry rub
4 tablespoons butter (2 per rack)
6 – 8 tablespoons apple cider vinegar (3 – 4 per rack)
SPRITz
2 cups apple cider vinegar, placed into a food safe spray bottle
Dry Rub
2 tablespoons kosher salt
2 tablespoons coarse ground pepper
2 tablespoons fresh rosemary, finely diced
2 tablespoons paprika
1 tablespoon garlic powder
1 tablespoon oregano
1/4 teaspoon cayenne pepper
BBQ SAUce
1 small onion, chopped (about 1 cup)
1 tablespoon butter (or avocado oil)
2 cloves garlic, diced
1 cup apple cider vinegar
1 can (15 oz) tomato sauce (no sugar added)
3 tablespoons tomato paste
1/2 teaspoon cayenne pepper
1/2 tablespoon paprika
1/2 tablespoon dry mustard
1/2 teaspoon kosher salt
1/4 teaspoon fresh ground black pepper
1 tablespoon Worcestershire sauce ((GASP, it has sugar and molasses in it, use it anyway))
Optional, but recommended: 2 TBSP brown sugar Swerve
Instructions:
For the Sugar Free Dry Rub
Combine all dry rub ingredients in a bowl and mix well.
For the BBQ Sauce
In a large pot set to medium heat, melt 1 tablespoon butter or avocado oil and add the onions. Stir occasionally until the onions are soft (golden/starting to caramelize), and sweet to the taste (at least 20 minutes). * you may need to adjust the heat and turn it down if they are browning too fast.
Next add the garlic and stir together for 1 minute. (burned garlic is very bitter, take care to not let the garlic burn)
Add the apple cider vinegar, tomato sauce, tomato paste, and mix. Add dry seasonings, Worcestershire, and brown sugar swerve if using. Simmer for 15-20 minutes. Using a hand immersion blender, or countertop blender, blend your sauce until smooth and there are no chunks. Taste and adjust seasonings to your preference. If its too thick add water or more apple cider vinegar.
For the ribs
In case you missed it in the intro, this is an important step, don’t skip it. Before you even think of taking the ribs out of the fridge, make the dry rub. (thank me later) After making the rub, remove the ribs from their packaging and pat dry with paper towels. Trim ribs of excess flap meat and pull off the silver skin membrane on the bone side. Brush both sides of ribs with mustard – Most Dijon’s have sugar added, make sure to choose one that does not, or use yellow mustard. Apply dry rub liberally on both sides, cover in plastic wrap, then foil. Chill in fridge overnight.
Preheat smoker to 250 degrees F (120 degrees C). We have a Traeger, so I used an oak, pecan, and mesquite blend. Depends on your preference. I love that smoker for many reasons, mainly because it maintains a constant temp.
Add the ribs to the smoker, close the lid, set a timer for 90 minutes, and if you didn’t have time before, go make the bbq sauce now.
After that 90 minute timer goes off, set it for another 90, and begin spritizing, roughly every 20 minutes (that’s three hours total). This keeps the ribs moist. After that you should see the bones protruding about ¼ inch, that’s the sign that it’s time to wrap. You should long be done with the sauce by now.
Place foil on a sheet pan, grab first rack of ribs and place on the foil. Add 2 tablespoons of butter, cut up into smaller pieces to evenly disperse, brush on a thin layer of sauce and sprinkle with 3-4 TBSP apple cider vinegar. Wrap tightly, then do it all over again with the second rack of ribs.
Place back on smoker for about two hours, checking after an hour to see if you’ve reached the texture that you want. Take care when opening, as steam will escape. We like ours falling off the bone, but realize that some people don’t, so check.
Unwrap, and discard foil, but leave ribs on the grill. Brush with sauce, how much is up to you. If you like a less messy rib, add a little. If you like it it dripping and gooey, add a lot. about 30 more minutes.
Remove both racks of ribs from grill, slice and enjoy.
This is one of my all time favorite recipes. I doubled it so it makes a lot, it freezes beautifully.
Ingredients:
2 quart water
4 lbs ground beef
8 cloves minced garlic
4 medium white onions, diced
4 8oz cans of tomato sauce
1 teaspoon red pepper
2 large bay leaf
8 tablespoons Chile powder
1 ounce unsweetened chocolate
4 TBSP white vinegar
1 TBSP salt
2 TSP cinnamon
2 TSP ground cumin
10 whole cloves and 10 whole allspice (put them in a spice bag or tea ball)
DIRECTIONS:
Mix ground beef and water in a 4 quart pan and stir till beef is fine pieces, turn heat to medium and boil for 30 minutes. Meanwhile, mise en place, measure out all other ingredients, chop the onions, mince the garlic, open the cans.
Once the meat has boiled, DO NOT DRAIN!!! Turn the heat to low, stir in remaining ingredients and let simmer uncovered for three hours.
Serve over cauliflower rice with your choice of toppings, I like chopped raw onions and grated extra sharp cheddar. If you want a little more crunch, top with the moon cheese or whisps of your choice.
This was a favorite of mine growing up, of course my dear lil’ mama made it with a regular pie crust, mayo, and milk. She was impressed when I made her the my Keto-fied version, said it tasted exactly like she remembered. That is high praise from my mother.
ingredients:
1 recipe Fat head dough crust, without the Italian seasoning. 12 oz tuna, packed in water, drained 1 c grated Swiss 1/2 cup green onion, whites and greens 3 eggs 1 cup mayo 1/4 cup heavy cream thinned with 1/4 cup water pinch of salt
(click on ‘picture instructions’ to jump down to those)
Preheat oven to 375 ℉
Prepare a 9 inch pie plate by spraying it with avocado oil.
Crust:
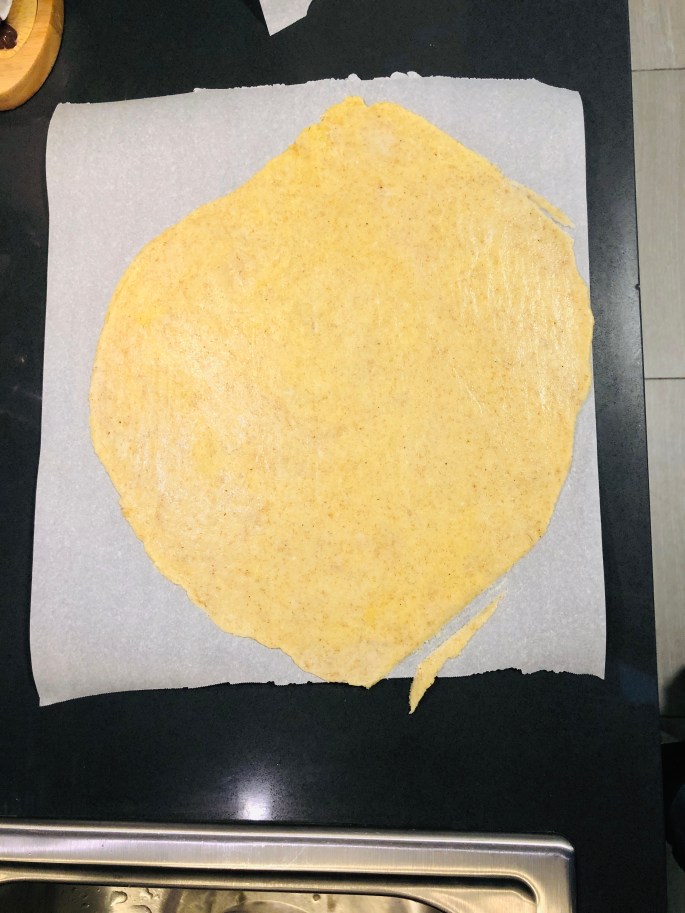
Prepare one recipe of Fat head dough crust, and roll thin between two pieces of parchment paper. You will want to end up with a piece of dough that it somewhat circular in shape, enough to fit the pie plate, and uniform in thickness. Thiner areas cook more quickly than thicker ones, and you don’t want any burned or raw spots in your crust. A good way to tell if you’ve made the circle big enough is to place the pie plate in the center, and if there are about three inches of overhang in all directions, you are good to go.
Remove top piece of parchment. Grasp the edge of the bottom piece of parchment paper and gently fold in half, then peel from dough and grasping side of parchment, fold into fourths. Gently remove from parchment entirely and transfer dough to pie plate, just like grandma used to do. Place the point of crust in the center of plate and gently unfold.
With one hand grasp edge of dough and gently lift, while pressing into the bottom of pan with the other, being careful to not make holes in the dough. Do this one section at a time, so that the crust touches all surfaces of the pie plate. Trim any excess, but leave enough for the edge that everyone loves. Crimp the edge. Using a fork, poke about two hundred holes into the bottom of the crust to allow air to escape while pre-baking, or use pie weights. Bake for 8 minutes, set aside.
filling and assembly
While crust is cooling a bit, make the filling. You will need two bowls, a medium and a large. Drain water from tuna and transfer to the medium bowl bowl. Fluff tuna with a fork, add swiss cheese and green onion and combine thoroughly. In the large bowl add mayo, cream, water, eggs, and salt. Whisk vigorously until smooth. Add tuna mixture to the egg mixture in the large bowl and combine well.
Now that crust has cooled a bit, pour filling into crust. Cover the edge of crust with aluminum foil or a pie crust shield, if you happen to have one, because it will burn if left uncovered. and place into preheated oven.
Bake for 25-30 minutes, until golden brown.
Any leftovers can easily be reheated in a 375 ℉ oven, but completely cover with aluminum foil before doing so.
Roll thin between two pieces of parchment paper, you will want to achieve a circular shape. This is a wonderful tool, a rolling pin with guides, any rolling pin will do.
You will want to end up with a piece of dough that it somewhat circular in shape, enough to fit the pie plate. A good way to tell is to place the pie plate in the center, and if there are about three inches of overhang in all directions, you are good to go.
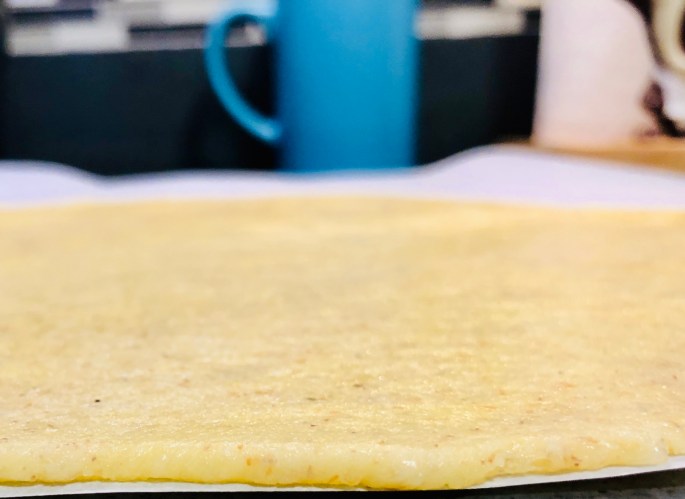
Try to get it a uniform thickness, thiner areas cook more quickly than thicker ones, and you don’t want any burned, or raw spots in your crust.
Remove top piece of parchment. Grasp the edge of the bottom piece of parchment paper and gently fold in half, then peel from dough and grasping side of parchment, fold into fourths. Gently remove from parchment entirely and transfer dough to pie plate, just like grandma used to do. Place the point of crust in the center of plate and gently unfold.
Gently unfold.
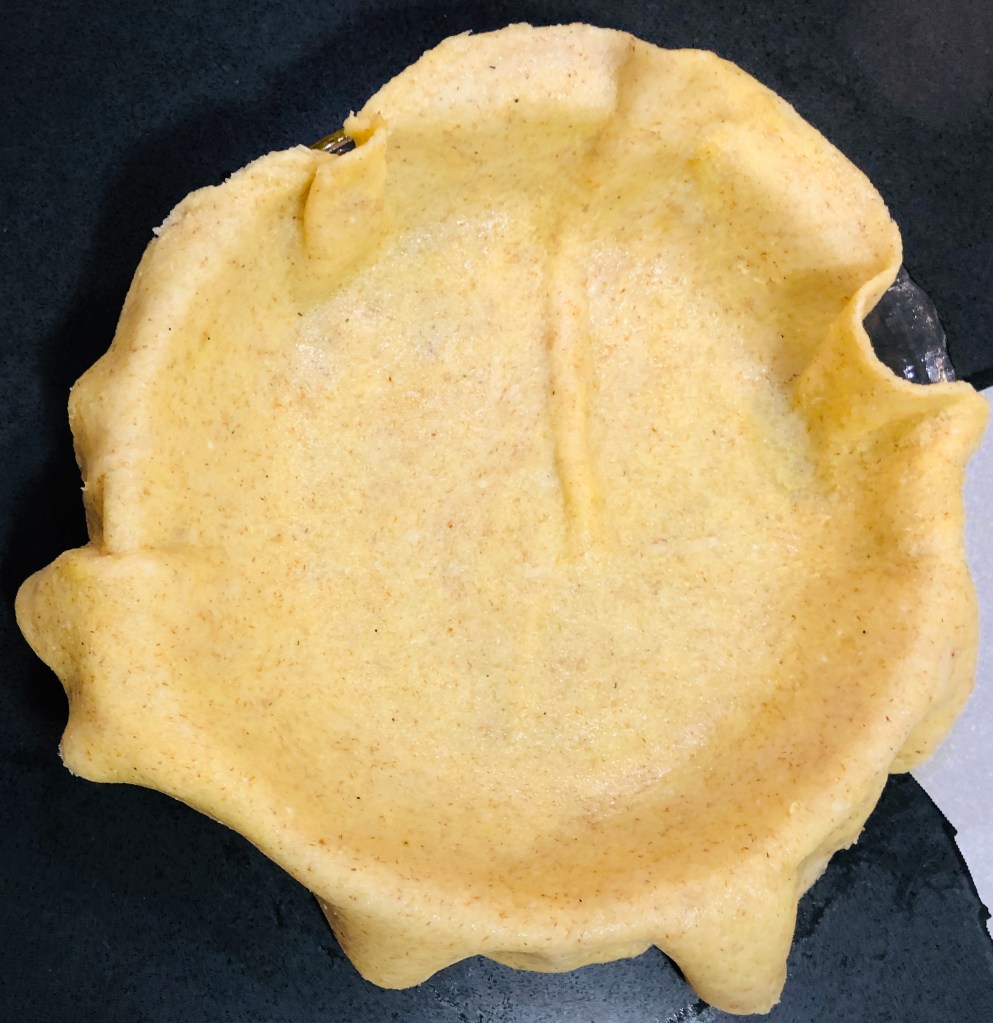
With one hand grasp edge of dough and gently lift, while pressing into the bottom of pan with the other, being careful to not make holes in the dough.
Do this one section at a time, so that the crust touches all surfaces of the pie plate. Trim any excess, but leave enough for the edge that everyone loves.
Remove excess, but leave enough to make a nice edge. Crimp the edge, or do whatever decorative design you like. Using a fork, poke about two hundred holes into the bottom of the crust to allow air to escape while pre-baking, or use pie weights. Bake for 8 minutes, set aside.
While crust is cooling a bit, make the filling. You will need two bowls, a medium and a large. Drain water from tuna and transfer to the medium bowl bowl. Fluff tuna with a fork
Add swiss cheese and green onion and combine thoroughly.
In the large bowl add mayo, cream, water, eggs, and salt. Whisk vigorously until smooth.
Add tuna mixture to the egg mixture in the large bowl and combine well.
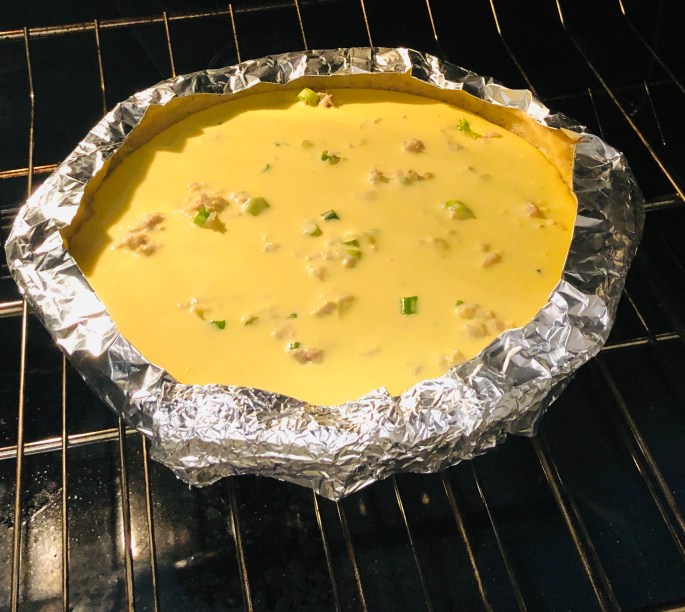
Now that crust has cooled a bit, pour filling into crust. Cover the edge of crust with aluminum foil or a pie crust shield, if you happen to have one, because it will burn if left uncovered.
If you do have a pie guard, chances are you are a much better baker than me, and got a laugh reading these directions.
Place in the pre-heated oven and bake for 25-30 minutes, until golden brown.
Just say NO (yup, I’m appropriating that phrase) to carby egg rolls, try this deconstructed egg roll instead. You won’t be sorry.
INGREDIENTS
1 pound ground sausage (you could also sub with ground turkey, ground beef, ground chicken, or plain ground sausage). I use spicy ground sausage.
1/2 white onion, sliced
4 cloves garlic, minced
2 tablespoons ginger, minced
2 tablespoon coconut aminos
2 (1.5 cup) bags of shredded cabbage, or a head of cabbage, shredded.
16 oz. mushrooms, sliced
2 beaten eggs (optional)
1 tablespoon sesame oil
A few pinch’s of sea salt.
Chopped green onion, for garnish.
DIRECTIONS:
1
Cook ground meat of your choice in a wok (or large skillet) over medium heat, adding the white onions, mushrooms, and salt about half way through. Cover for 5 minutes, stir, and cover for 5 more minutes, this will allow the onions and mushrooms to sweat. Before moving onto step 2, make sure meat is crumbled and cooked through. Do not drain.
2
Stir in garlic, ginger, and coconut aminos. Stir fry for a few minutes until well combined.
3 (optimal step, disregard if not using eggs)
Push mixture up the sides of wok, making a well in the middle, pour in eggs and scramble, combining with the meat/onion/mushroom mixture.
4
Add cabbage and stir for a few minutes until softened.
5
Remove from heat, drizzle on sesame oil, plate it up, and top with green onions.
NUTRITIONAL INFORMATION:
I always hesitate to add this information because it will vary depending on chosen ingredients. I suppose a rough idea is better than none.
Yield: 6, Serving Size: 1 Amount Per Serving: Calories: 264, Total Carbohydrates: 10.1g, Fiber: 3.2g, Net Carbohydrates: 6.9g, Total Fat: 12g, Protein: 28.3g